Obj-C: How to spell out Numbers as Text

ProgrammingMagifierYesterday, I showed you in this article on how to do basic math in Objective-C (and it could work in other languages as well).

Now today, I am going to show you a unique feature that you can put inside your apps – how to convert a standard number such as 934 and have the app convert them to letters – such as “nine hundred thirty four“.

But why would we need this?  Well, let’s say you were writing a app to write out checks.  You would need the app to print the spelled out version of an amount that a user would input in to a text field, or you’re writing an app that actually says a number to a user using speech.

For this we use a little known command called NSNumber.  We use it to format a number and then tell NSNumber how to format the number for final output to the user.

Again, this is a basic example.  For more complexed output, do a search on Google.com.

Let’s take a look at the below code:

NSNumber *value = [NSNumber numberWithInt:534];
NSNumberformatter *formatter = [[NSNumberFormatter alloc] init];
[formatter setNumberStyle:NSNumberFormatterSpellOutStyle];
NSLog(@”Numeric: %@\nText: %@”,value,[formatter stringFromNumber:value]);
[NSNumberformatter release];

Now, let’s take a look at the code:

1.  Assign NSNumber the variable “value” and initialize it with the number 534.
2. Call the NSNumber formatter to get it ready to format the output to a user.
3.  Set the value *formatter to the NSNumberformatter command.
4.  Use the formatter value to tell the computer how to format the number.
5.  Print the result to the terminal.
6.  Release the NSNumberFormatter from memory.

That’s it.  Happy coding!

iOS: How to get a button to work – Part 2

iOSLogoOne of the biggest problems that I had in learning Objective-C is getting a button to respond to a user‘s tap inside of a button.  Yes, it may seem simple now, but when I was trying to learn how, this obstacle got under my skin for months.

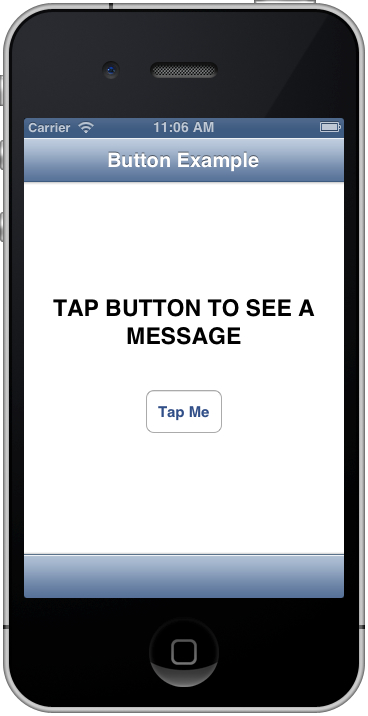
When the app is completed, it will show an UILabel that says “Tap Button to see Message”.  When the user taps it, another message will appear in place of the first one.

Let’s call this example ButtonExample and use a single viewController.

Here’s the code:

ButtonExample.h:

#import <UIKit/UIKit.h>

 @interface ViewController : UIViewController

{

    UILabel *message;  // Label for Message.

}

@property (nonatomic, retain) IBOutlet UILabel *message;  // Assign label to an IBOutlet for displaying the msg.

 -(IBAction)btnTapButton:(id)sender;  // Assign a button tap to an IBAction with the value of “btnTapButton”.

 @end

ButtonExample.m:

#import “ViewController.h”

@interface ViewController ()

@end

@implementation ViewController

@synthesize message;   // Synthesize the message valuable so we can use it later.

 – (void)viewDidLoad

{

    [super viewDidLoad];

    message.text = @”TAP BUTTON TO SEE A MESSAGE”;  // When app loads, tell user what to do.

}


-(IBAction)btnTapButton:(id)sender  // Call IBAction for the Button.

{

    message.text = @”Hello, you’ve tapped the button!”;  // Display another message after button is tapped.

}

 – (void)didReceiveMemoryWarning

{

[super didReceiveMemoryWarning];

  // Dispose of any resources that can be recreated.

}

-(void)dealloc

{

  [super dealloc];

[message release];   // Clear message variable when user exits the app.

}

@end

Now go in to Interface Builder and drag the following:

– A navigation Bar to the top of the view.
– An UILabel in the middle of the view.
– An UIButton under the UILabel and mark it “Tap Me”.

1.  Connect the UILabel outlet to the UILabel in the middle of the view.
2.  Connect the UIButton outlet to the UIButton under the UILabel.
3.  That’s it.

Happy coding!

Finished Result:

ButtonExampleJPG


iOS: The difference between an IBAction and an IBOutlet

iOSLogoAs I was learning Objective-C to make iOS apps, one of the areas that got me confused was knowing the difference between what was an IBAction and an IBOutlet.  Although simple now, this topic seems to also confuse a lot of new iOS programmers as well.

To put it in English terms so that everyone can understand what they are:

IBAction:
Defines what a user will do when they take “action” inside your app – such as tap on a button.

IBOutlet:
An IBOutlet defines what the app may show to a user – such as a message inside of a UILabel.

Examples:

-(IBAction)btnSave:(id)sender;

IBOutlet UILabel *showMessage;

Also remember, that the IB means that you’re going to be making connections inside of Interface Builder – whether it is an Action or an Outlet.

I’ll post a programming example of the above commands sometime next week – stay tuned!

Happy Coding!

iOS: How to go from one viewController to another

Although this topic may seem basic, a lot of programmers (including me) get stuck on how to go from one view to another by code.  Sure, one can use StoryBoarding as a way around it, but that only works with apps from iOS 5 on up.  You have to keep in mind that some of the end users are still running older versions of iOS.  I met someone that was still using iOS 3.

In order for you to know what to use, you first have to decide what view your coming from.  If it is a tableView, you use one option.  If it’s a standard view, then you use another.  A standard view has many more transition options: from non to a complete flip animation.  I have used several and feel it helps keep the user‘s attention.

I will go over the two options below.

First, let’s go over going from one viewController to another:

ViewController *controller = [[ViewController alloc] initWithNibName:@”ViewController” bundle:nil];

controller.modalTransitionStyle =  UIModalTransitionStyleCrossDissolve;

[self presentModalViewController:controller animated:YES];

[controller release];

The above code seems simple enough. This block of code is contained inside a -(IBAction) code block.  When a user taps on a button, the code will activate, the transition will begin, and they will be taken to the viewController that’s specified in the code block.

Now, let’s see how to go from a tableView option to a standard viewController:

if (indexPath.row == 0) {

aViewController *AVC = [[aViewController alloc] init];

[self.navigationController pushViewController:AVC animated:YES];

[AVC release];

This is how I take the user from a tableView option to a standard viewController if the tableView only has a few options on it.

Again, the code is simple enough.  If the end user taps tableView row 0 (the very first cell) then go to a viewController that I specify within the first command in the second line of the code block.

In a later article, I will show you how to make the iOS device decide what cell the user tapped on and go to the correct viewController.

iOS: How to show a basic UIActionSheet

I’ve went over two ways that one can show an UIAlertView.  Now here’s an example of showing an UIActionSheet.

An UIActionSheet is an alert that comes up from the bottom of the iOS device.  During last year’s WWDC, Apple recommended using this instead of the UIAlertView simply because it was a less intrusive way to communicate with the user.  But a user still has to dismiss the alert before they can continue using the app.

As always, you have to call the UIActionSheetDelegate in the .h file so you can have complete control over the command during development and at runtime.

The format of the command is a little different then the other, but it’s the same idea.

The delegate method is:

<UIActionSheetDelegate>

That’s all you need to get it working.

Now, the format of the command for the .m file is as follows:


UIActionSheet *action = [[UIActionSheet alloc] initWithTitle:@”Hello There!”

    delegate:self

    cancelButtonTitle:@”OK”

    destructiveButtonTitle:nil

     otherButtonTitles:nil];

    [action showInView:self.view];

    [action release];

}

Again, the above is a basic example.  But lets go over it line by line:

1.  We assign the UIActionSheet command to the action variable.
2.  The title of the action sheet will be “Hello There “.
3.  The delegate will be assigned to itself.
4.  The cancel button title is how the user dismisses the alert.
5.  The destructive and the otherButtonTitles will be covered in a later article.
6.  Show the action sheet in the same viewController that the user activated it.
7.  Release the action sheet from memory after it shows to the user.

That’s it!

iOS: How to make something appear on the screen

Although the topic sounds basic, a lot of new programmers (myself included) have a hard time understanding how to print something (such as the standard HELLO WORLD) to the screen of an iOS device.  Sure, you could just throw an UILabel on to the iPhone template and manually print something.  But what if you wanted to change the UILabel during the execution of the app.?  I’m sure I’ll get emails and messages for being so basic, but like I said, I had a hard time grasping the concept until I knew what I was doing.

First thing, although some iOS programmers refuse to use Interface Builder (IB herein), I don’t.  It is a lot easier to visually build your user‘s interface then to do it by code.  So, all of my examples will be using IB for the layout.

The goal for this project is to have an UILabel and an UIButton.  When a user first goes into the app, it will show the word HELLO.  When they tap the button, the label will change to say WORLD.

Fire up Xcode, and choose the single view template, select the UIViewController, and name the project Hello World.

No delegates need to be activated for this project.

Here’s the code:

HelloWorld.h:

#import <UIKit/UIKit.h>

@interface ViewController : UIViewController

{

UILabel *initialMessage;            // Varable for the opening message.

UILabel *afterButtonClick;          // Varable for when a user clicks the Button.

}

@property (nonatomic, retain) IBOutlet UILabel *initialMessage;

@property (nonatomic, retain) IBOutlet UILabel *afterbuttonClick;

-(IBAction)btnChangeMsg:(id)sender;     // Name of button for IB.

@end

HelloWorld.m:

#import “ViewController.h”

@interface ViewController ()

@end

@implementation ViewController

@synthesize initialMessage;

@synthesize afterbuttonClick;


– (void)viewDidLoad

{

[super viewDidLoad];

initialMessage.text = @”HELLO”;     // Print the opening message.

}

-(IBAction)btnChangeMsg:(id)sender

{

afterbuttonClick.text=@”WORLD!”;    // Print this after button is tapped.

}

-(void)dealloc

{

[super dealloc];

initialMessage = nil;           // Wipe the varable clean when user aborts the app.

[initialMessage release];       // Make sure all RAM is cleared when user aborts the app.

}

– (void)didReceiveMemoryWarning

{

[super didReceiveMemoryWarning];

// Dispose of any resources that can be recreated.

}

@end

As always, the example code is here.